Tutorial: Creating reports (1 / 5)
Tutorial Table of Contents
part 1: Standard report typespart 2: Special report types
part 3: Delivery by email
part 4: On-demand reports with custom settings
part 5: Customizing reports
Part 1 of 5: Standard report types
Planyo has an extensive reporting mechanism, with possibility to create reports as web pages (HTML), PDFs or CSV (for importing into Excel / Google Drive or other spreadsheets).
The standard reports will simply list all reservations created within specified date range (called Reservation creation date report) OR with rental taking place within specified date range (called Rental start time and Rental end time in planyo).
To create a new report, go to Schedule & Reports / My Reports.

Here you'll see a dashboard with an overview of your reservations where you see daily activity (customers arriving or reservations entered) for periods such as last/next/this month/week etc with the totals (number of reservations and earnings) and a possibility to see the exact list of reservations for the displayed period (click on the number in the header). Underneath the graph you can apply a number of filters to see stats for a subset of your reservations (e.g. for specific resource or marked with specific color).
On the right-hand side, under My reports you'll see a list of your custom reports. If the report owner selected the setting this is a private report then such report will not be seen by other admins. Otherwise reports created by other admins of your planyo site will also be visible. Click on Create new report. This will open a page where you fill out the basic report options.
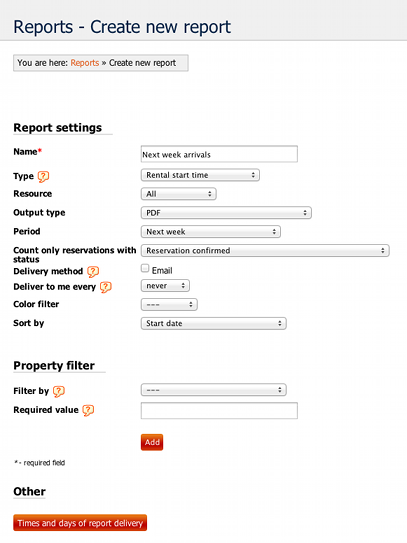
In this sample, we'll create a report of persons arriving next week. Later we'll configure this report to be sent by email every Friday afternoon. For arrivals, report type should be set to Rental start time, for departures, choose Rental end time, and for a report of reservations entered into the system during a period, choose Reservation creation date (for other report types, see the next part of this tutorial). We'll leave the other options at defaults, except we want the default output type as PDF. You could set a number of filters here, as well:
Click Add to add this report to My reports and you're all done! Clicking on the report name in the dashboard will show you an overview of arrivals/earnings included in the report (similar to the one in the dashboard), and will let you do a number of other operations such as edit the report settings, download (default format or choice of PDF/CSV/HTML), delete the report, see the report for a different date range or filters, or make a duplicate to easily create a similar report. At the bottom you'll also see a listing of reservations included in the report. Please note this is a preview only and will NOT include custom fields included further in part 5 of this tutorial.
The standard reports will simply list all reservations created within specified date range (called Reservation creation date report) OR with rental taking place within specified date range (called Rental start time and Rental end time in planyo).
To create a new report, go to Schedule & Reports / My Reports.
Here you'll see a dashboard with an overview of your reservations where you see daily activity (customers arriving or reservations entered) for periods such as last/next/this month/week etc with the totals (number of reservations and earnings) and a possibility to see the exact list of reservations for the displayed period (click on the number in the header). Underneath the graph you can apply a number of filters to see stats for a subset of your reservations (e.g. for specific resource or marked with specific color).
On the right-hand side, under My reports you'll see a list of your custom reports. If the report owner selected the setting this is a private report then such report will not be seen by other admins. Otherwise reports created by other admins of your planyo site will also be visible. Click on Create new report. This will open a page where you fill out the basic report options.
In this sample, we'll create a report of persons arriving next week. Later we'll configure this report to be sent by email every Friday afternoon. For arrivals, report type should be set to Rental start time, for departures, choose Rental end time, and for a report of reservations entered into the system during a period, choose Reservation creation date (for other report types, see the next part of this tutorial). We'll leave the other options at defaults, except we want the default output type as PDF. You could set a number of filters here, as well:
- Resource lets you specify a single resource, all resources, or a selection of resources. If you want to take advantage of this possibility, change the value to property filter. The following fields let you specify a custom resource property and value required for a resource to be included in the report. Resource properties are defined by you and can include any information describing your resources, such as max. number of persons (so you can create a report for single rooms only).
- Period lets you set the default period for the report. You will always be able to create reports for a different period as well, but a default is needed. The values at the bottom (such as -1 week or +2 weeks) simply list X previous or next days, the values at the top of the list (such as last week/next month) always start/end at the beginning of given period (e.g. 1st day of a month or a Monday/Sunday -- depending on your site settings -- for weeks). You can also choose fixed dates which can be useful e.g. for your fixed events.
- Count only reservations with status let you choose the required status in order for a reservation to be listed. This way you can create a list of cancelled reservations, no shows (confirmed and not checked in), or you can list only confirmed reservations.
- Color filter lets you specify a color which must be assigned to a reservation in order for it to be listed. Colors can have special meanings defined by you so the usage of this filter depends on your individual setup. For example, you could mark with a red color reservations which require you to check your bank account statement to see if a wire transfer arrives before final confirmation.
- Sort by lets you sort the items in the report according to a number of criteria. Custom fields in the reservation form will be also present here, so you could have your data rows sorted e.g. by the voucher code used. This field can be also important if you want to customize your report (see part 5) by adding subtotals/grouping. This will only work when grouping is set to the same criterium as sorting and lets you get subtotals for each voucher code (and for no voucher), for example.
- Property filter lets you filter the reservations according to a custom reservation form field, or total paid so you can see e.g. reservations without payments or with 100% paid. The value lets you include ranges (e.g. number of persons arriving less than 3).
Click Add to add this report to My reports and you're all done! Clicking on the report name in the dashboard will show you an overview of arrivals/earnings included in the report (similar to the one in the dashboard), and will let you do a number of other operations such as edit the report settings, download (default format or choice of PDF/CSV/HTML), delete the report, see the report for a different date range or filters, or make a duplicate to easily create a similar report. At the bottom you'll also see a listing of reservations included in the report. Please note this is a preview only and will NOT include custom fields included further in part 5 of this tutorial.